
Creative Ceiling Tile Designs: Materials, Moisture Protection, and Acoustic Comfort
We painstakingly compare flooring options, yet usually leave our home’s largest surface completely blank. Designers consider this overlooked expanse the “fifth wall,” treating it like a ceiling-mounted area rug that anchors a space. Exploring creative ceiling tile designs instantly unlocks this untapped aesthetic potential. In practice, choosing specific ceiling materials drastically alters a room’s visual weight. Rich, heavily textured finishes can make tall rooms feel cozy, while bright, reflective patterns can make smaller spaces feel taller. If you enjoy practical design and build guides, you can also browse our Blog. Beyond adding architectural character, suspended ceiling panels can hide pipes and wiring in basements while keeping access simple. If your project involves technical spaces and compliance requirements, you can also review our Certifications page for documentation. From Tin to PVC: Choosing the Right Material for Your Style and Budget Achieving a high-end vintage aesthetic does not have to break the bank. Modern manufacturing allows lightweight materials to mimic premium metals and woodwork. Before committing, consider substrate weight and how your ceiling structure will support it. Tin: Tin and aluminum tiles add classic shine, but they are heavier and often cost more. PVC: 3D textured PVC ceiling tiles provide waterproof performance and a budget-friendly look. Mineral Fiber: A strong option for reducing echoes in basements and offices. Wood: Warm and natural, but typically the heaviest and may require stronger support. Once you pick a style, the room environment matters. Moisture and heat can quickly damage the wrong ceiling finish, especially in kitchens and bathrooms. Protecting Ceilings in High-Moisture Rooms Like Bathrooms and Kitchens Steam rises and turns ceilings into moisture magnets. Standard drywall and basic mineral fiber tiles can absorb humidity and sag over time. In wet rooms, choose non-porous surfaces that do not soak up moisture. Waterproof PVC tiles help stop warping and allow quick wipe-down cleaning. If you want a reference point for protection standards that are also used for enclosures and water exposure, see the official IP rating overview: IEC IP ratings. Say Goodbye to Echoes: Using Acoustic Tiles to Quiet Your Home Office or Basement Hard surfaces reflect sound and create echoes. Acoustic ceiling tiles reduce reflections by absorbing sound energy. Today’s decorative acoustic options combine better looks with performance, which helps home offices, basements, and media rooms feel calmer. Home offices: clearer audio on calls and less household noise bleed. Basements: reduced echo and less sound traveling upstairs. Media rooms: improved clarity and less harsh bounce. Drop vs. Glue-Up: Matching Installation Methods to Ceiling Height Drop ceilings use a grid system below the framing, which helps hide utilities and keeps future access simple. However, they require clearance, so measure headroom before installing. Glue-up tiles mount directly to flat surfaces and preserve ceiling height. They are often a practical DIY option for rooms that already feel tight. If you want help choosing the right approach, you can contact us. Transforming Your Space with the Right Pattern and Finish You do not have to settle for a blank ceiling. By matching patterns with practical materials, you can balance design impact with functional needs. Start with a small room to test installation, then scale the approach across larger spaces once you are confident.
Best Soundproof Wall Panels for Peaceful Sleep: NRC vs STC Explained
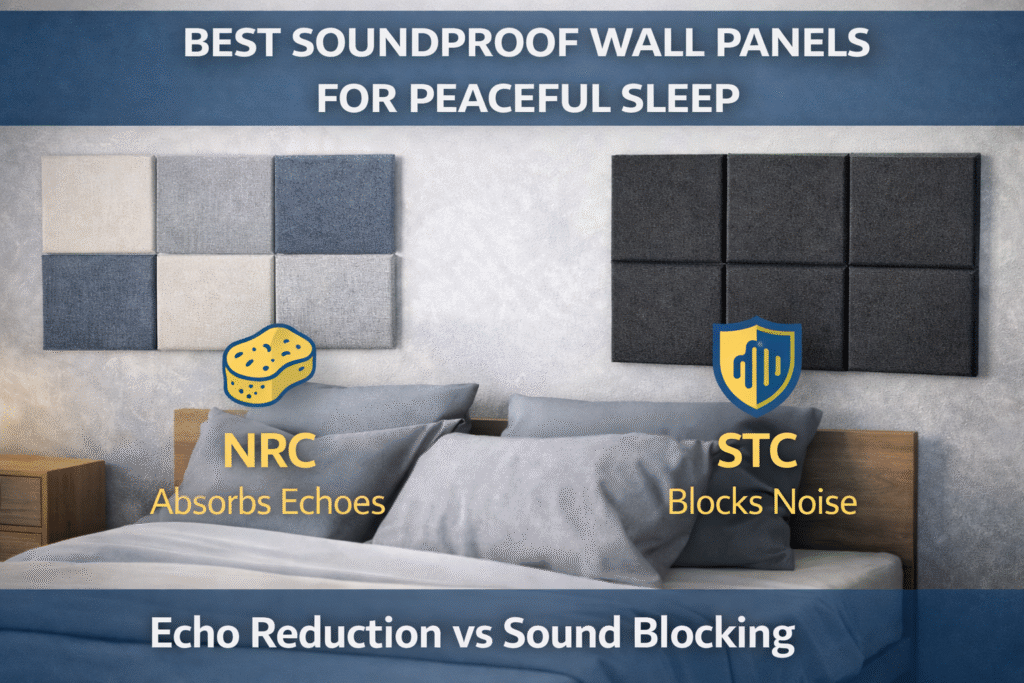
You tried earplugs. The 6:00 AM garbage truck still wakes you up. Searching for the best soundproof wall panels often starts with a mistake. People buy cheap foam expecting silence. Acoustic pros separate two concepts. Absorption reduces echoes inside the room. Blocking reduces noise entering from outside. If you want more practical guides, browse our Blog. For a trusted overview of noise exposure and why blocking matters, see NIOSH guidance: NIOSH noise topic. The Physics of Peace: Using the Sponge and the Shield to Quiet Your Room Think of absorption as a sponge. It soaks up reflections and reduces echo. Think of blocking as a shield. It stops sound transmission through walls. NRC: This measures echo absorption inside a room. It helps with reverb and snoring tone. STC: This measures sound blocking through walls. It helps with voices and traffic noise. If you hear clear words, you need more STC. If you hear hollow echo, you need more NRC. Heavy-Duty Defense: High-Density Panels for Blocking Traffic and Neighbors Low frequency noise needs mass. Dense materials reduce transmission better than foam. This is why heavy panels often work best for bedrooms. Rockwool: High density and strong for voice blocking. It can be heavy. Fiberglass: Effective for STC upgrades. It can irritate skin. Polyester: Safer to handle. It is weaker for deep bass rumble. Mass Loaded Vinyl adds more mass. Decoupling clips reduce vibration transfer through studs. This combo can improve results a lot. If you work on technical specs and compliance, review our Certifications page. Renter-Friendly Solutions: Decorative Art and Adhesive Tiles for Snoring and Echo Renters can still reduce echo. Use absorption near the bed and first reflection points. Choose panels that look like decor, not studio foam. Prep: Apply wide painter tape on the wall. Stick: Add mounting tape on top of the painter tape. Mount: Press lightweight tiles firmly into place. The Gap Factor: Strategic Placement and Installation to Prevent Sound Leaks Sound leaks through gaps like water. Seal door cracks and window gaps first. Then place panels where reflections hit first. Use the mirror method. Sit on the bed and slide a mirror on the wall. When you see the noise source, place absorption there. From Tossing and Turning to Total Quiet: Your Personalized Soundproofing Roadmap Start with gaps and the wall behind your headboard. Then upgrade in steps. You will feel improvements faster. $50: Add weatherstripping to doors and windows. $200: Add fiberglass boards to reduce echo and improve speech blocking. $500+: Add dense systems with MLV and decoupling clips. If you want help choosing a durable solution for a project, contact our team: Contact us.
Benefits of Plastic Wall Panels in Bathrooms: Waterproof Style With Less Cleaning
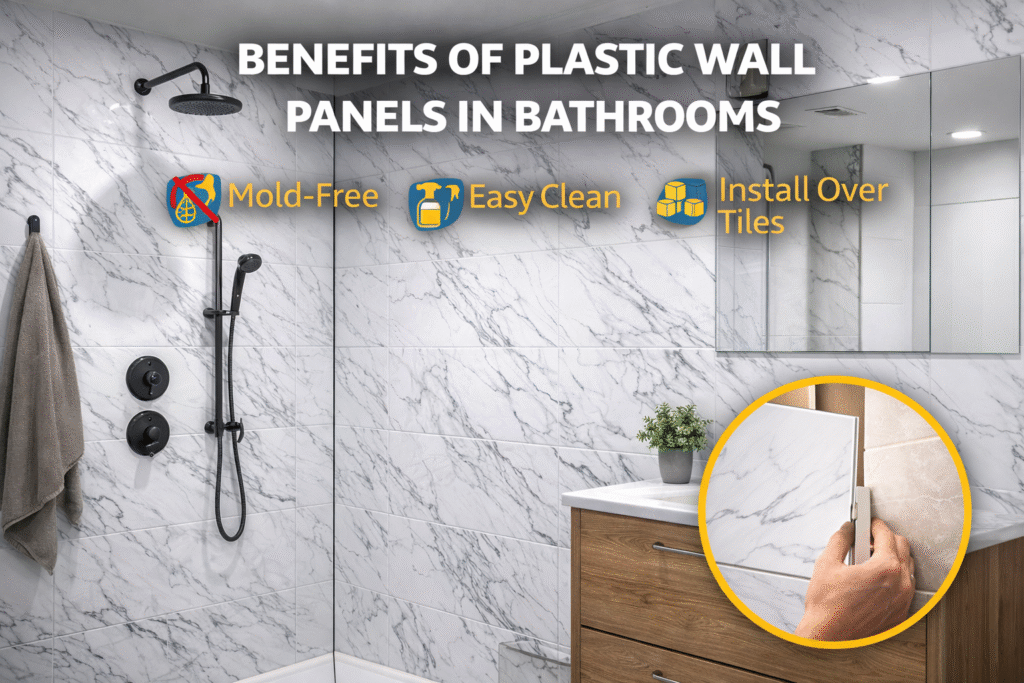
Imagine spending your Saturday morning scrubbing moldy tile cracks with an old toothbrush. Bathroom moisture often breeds mold because grout is porous. It behaves like a sponge that absorbs daily shower water. Industry experts note that modern PVC wall panels remove this chore because the surface is smooth. Water runs off instead of soaking in. For practical guidance on mold prevention in damp rooms, see the EPA overview: EPA mold guidance. Installing waterproof 4×8 bathroom wall panels can shorten renovation time. It can also reduce demolition mess. If you want more practical guides, browse our Blog. How to Get a Luxury Marble Look Without the Stone Price Tag Decorative wall panels can look premium with high definition surface printing. Realistic marble visuals are bonded onto durable PVC. This gives a luxury effect without the stone cost. Popular finishes include: Marble-effect: Elegant veins with a clean look. Timber-style: Warm texture with better humidity stability. Solid Gloss: A bright finish for modern bathrooms. The key is the large format surface. Panels click together to reduce visible joints. This also removes most grout lines. Say Goodbye to Mold: Why Non-Porous PVC is a Hygiene Game-Changer Grout absorbs moisture and can trap dirt. That makes cleanup harder over time. Non-porous PVC creates a barrier that resists water absorption. The tongue-and-groove edge design helps form a watertight seal. This can protect the wall behind the shower area. It also reduces the risk of hidden moisture damage. The Weekend Warrior’s Secret: Installing 4×8 Panels Over Existing Tiles You can often install panels over existing tiles if the surface is solid. This avoids demolition and saves time. The job can feel more like assembly than construction. Basic tools usually include: Fine-tooth saw Adhesive Silicone sealant Level Tape measure Leave a small expansion gap at edges. Fill it with flexible silicone. This helps prevent warping during temperature changes. More Than Just a Pretty Face: The Durability and Insulation of uPVC Tiles can feel cold after a shower. Many panels use a hollow core structure. Air pockets can reduce heat loss and improve comfort. uPVC panels also handle bumps better than fragile finishes. That helps in busy family bathrooms. Cleaning is simple because the surface wipes down fast. Your Path to a Low-Maintenance Bathroom: Comparing the Final Pros and Cons If you want low-maintenance walls, PVC panels are a strong option. Start with measurements, then choose a finish, then test samples in your lighting. If you need help choosing materials, you can contact us. If your project also needs waterproof protection hardware for outdoor installs, see our Waterproof Junction Box solutions.
Benefits of Installing Wood Panel Walls: Warmth, Durability, and Better Acoustics

Step into any room featuring floor-to-ceiling wood for inside walls, and you immediately sense a shift in the atmosphere. The space feels grounded in a way flat paint cannot achieve. However, the true benefits of installing wood panel walls go beyond aesthetics, especially when you want a warmer and more functional home. Rather than serving as decor only, modern wood panel design can improve comfort and protect busy spaces. In practice, timber can help absorb sound and retain heat. For a deeper technical overview of wood as a material, you can review the Wood Handbook from the U.S. Forest Products Laboratory: Wood Handbook (FPL). If you enjoy practical home improvement guides, you can also explore more topics in our Blog. If you want help selecting the right approach for your room, feel free to contact us. Transforming Flat Walls Into Architectural Statements Without a Contractor Plain drywall can make a room feel unfinished. Wood wall paneling introduces warmth and depth, adding texture that changes with daylight. As a result, the room feels intentionally designed rather than basic. Height perception: Vertical wood paneling draws the eye upward and makes ceilings feel higher. Focal point creation: A wood panel accent wall anchors the area behind a bed, desk, or sofa. Texture layering: Subtle shadow lines add visual movement without extra decor. In addition, vertical wood plank walls help “visual zoning.” If your home office shares a corner with the living room, a paneled section defines that workspace without building a physical divider. The “Shield” Effect: Why Wood Cladding Beats Drywall for Busy Families Daily life is tough on painted drywall. Scuffs and dents create a cycle of patching and repainting. Wood cladding reduces that stress because it handles bumps better and stays attractive for longer. Moreover, sealed wood is easier to clean than matte paint. Instead of leaving shiny scrub marks, you can wipe common splashes with a damp cloth and keep the surface consistent. Quiet Rooms and Lower Bills: The Invisible Science of Wood Insulation Some rooms stay cold because heat escapes through thin surfaces. Choosing wood for inside walls can help retain warmth and improve comfort. Wood also reduces echo because its structure diffuses sound, which helps video calls and shared living spaces. Heat retention: Wood can improve comfort and reduce cold-wall sensation. Sound absorption: Panels reduce harsh reflections and improve acoustics. Humidity regulation: Wood can buffer small humidity swings in normal indoor use. From Peel-and-Stick to Slat Walls: Choosing Your Perfect DIY Entry Point You do not need a contractor to start. Peel-and-stick panels can create an accent feature quickly, while tongue-and-groove systems offer a more permanent finish. Therefore, your choice depends on whether you want flexibility, long-term durability, or a specific look. For bathrooms and kitchens, moisture matters. Choose suitable materials for damp areas, and prioritize finishes designed to resist humidity and warping. Your Weekend Action Plan: Starting Your Wood Panel Transformation The benefits of installing wood panel walls combine visual warmth, real durability, and better everyday comfort. Measure your wall, pick the right material, and plan a weekend installation. After that, constant drywall touch-ups become far less common, and your room gains a long-lasting architectural upgrade. If you want more step-by-step guides, check the Blog. If you want recommendations for your project, you can contact us anytime.
Soundproof Panels: How to Reduce Echo and Improve Room Acoustics
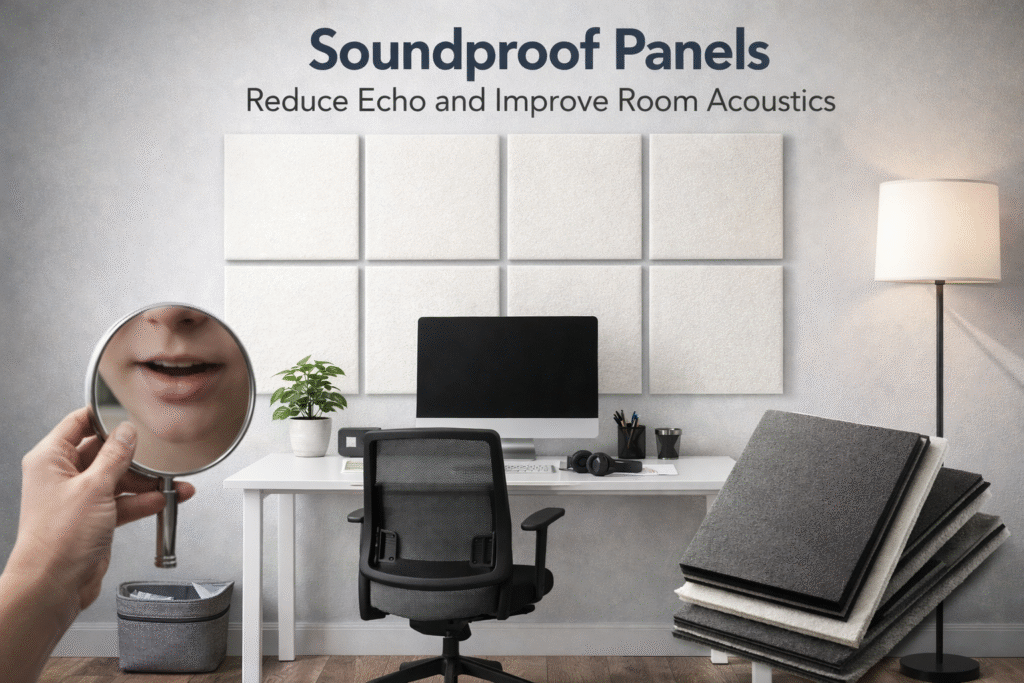
Soundproof panels help reduce echo and improve sound clarity in any room. If your office sounds like a tiled bathroom during calls, you are dealing with acoustic reflection. A simple clap test can reveal the issue. If the sound lingers, your walls are reflecting noise instead of absorbing it. Fixing this problem does not require a fully silent room. Instead, you need to control how sound behaves. The right soundproof panels can absorb echo and create a more comfortable space for work or recording. Soundproof Panels vs Acoustic Panels: Understanding the Difference Many people confuse soundproofing with sound absorption. However, soundproof panels and acoustic panels serve different purposes. Sound absorption panels: Reduce echo inside a room. Soundproof panels: Block sound from entering or leaving a space. If your goal is better call quality, absorption panels are enough. If you want to block external noise, you need dense materials like mass-loaded vinyl. To better understand acoustic principles, you can read this guide: Soundproofing basics. How Soundproof Panels Work with NRC Ratings When choosing soundproof panels, you will often see NRC ratings. This score shows how much sound a material absorbs. A panel with 0.80 NRC absorbs 80% of sound energy. It is important to compare NRC with STC ratings. NRC measures echo reduction, while STC measures sound blocking. Most lightweight panels focus on absorption, not isolation. Thicker panels perform better. One-inch panels handle high frequencies. Two- to four-inch panels absorb deeper sounds like voices and bass. Best Soundproof Panels Materials for Home and Office The material you choose affects both performance and design. The best soundproof panels combine efficiency with aesthetics. Acoustic foam: Affordable and easy to install, but limited performance. Mineral wool: High density and excellent absorption across frequencies. Fabric panels: Decorative and powerful, ideal for living spaces. Fire safety is also important. Always choose panels with a Class A fire rating. If you are also improving interior design materials, you can explore interior wall panel solutions for modern spaces. Where to Place Soundproof Panels for Best Results Correct placement is essential to maximize the performance of soundproof panels. The goal is to treat the first reflection points. You can easily find these points using the mirror trick: Sit in your normal position. Move a mirror along the wall. Mark where you see your reflection. Install panels at these spots. This method helps reduce echo quickly and improves sound clarity during calls or recordings. For more room design inspiration, you can also visit Houzz interior design ideas. How to Install Soundproof Panels Without Damage Installing soundproof panels does not need to damage your walls. Avoid strong adhesives that can peel paint. Instead, use mounting systems like Z-clips. These allow you to hang panels securely and remove them easily if needed. This solution works well for renters and temporary setups. Your Simple Plan to Improve Room Acoustics Improving your space with soundproof panels is straightforward. Focus on three steps: Choose the right material for your needs. Place panels at reflection points. Install them using safe mounting systems. After installation, repeat the clap test. A short, clean sound means your acoustic treatment works. With the right setup, soundproof panels transform noisy rooms into clear and comfortable environments.
Composite Fencing: A Low-Maintenance Alternative to Wood
Composite fencing offers a durable and low-maintenance solution for homeowners who want privacy without constant upkeep. Every few years, many backyards require sanding, staining, or replacing damaged boards. This repetitive work takes time and money. By contrast, composite fence systems are designed to keep their appearance for years with minimal maintenance. Wood-Plastic Composite, also called WPC, helps solve the classic problems of traditional timber fencing. It combines wood fibers and plastic resins to create a material that resists rot, moisture, splinters, and fading. As a result, composite fencing has become a popular choice for modern residential projects that need both strength and aesthetics. How Composite Fencing Is Made Manufacturers create composite fencing by blending fine wood flour with recycled plastic. This process forms boards that look like wood but perform much better in wet and demanding outdoor conditions. The wood fibers provide texture and a natural appearance, while the plastic content improves resistance to water and insects. This material is part of a broader category of modern composite construction products. If you want a technical overview, you can read more about wood-plastic composite materials. Moisture resistance: The plastic component reduces water absorption and helps prevent rot. Splinter-free surface: Boards remain smooth and safer for families and pets. Pest resistance: The core is far less vulnerable to termites and other wood-boring insects. Capped Composite Fencing for Better Weather Protection Modern composite fencing often includes a protective outer layer called a cap. This shell shields the board from sunlight, stains, and surface mold. It works like a protective skin that improves color retention and makes cleaning easier. Thanks to this capping technology, homeowners can enjoy fence panels that resist fading and stay attractive for years. This is especially important in climates with strong sun, rain, or high humidity. If you are also exploring exterior cladding and decorative wall systems, you can review our WPC wall and ceiling cladding solutions for related outdoor and architectural applications. Composite Fencing Installation and Expansion Gaps Like many polymer-based building materials, composite fencing expands and contracts with temperature changes. This movement is normal, but installers must allow space for it. Without proper spacing, fence boards may warp or push against each other over time. To ensure a stable installation, follow these good practices: Check the manufacturer’s spacing recommendations. Leave a small expansion gap between board ends. Install boards during moderate temperatures when possible. Use hidden clips or dedicated fasteners for cleaner results. Many modular systems also use sleeves or covers over structural posts. This improves the finish while helping protect the support structure. Composite Fencing vs Wood: Long-Term Cost and Value At first glance, timber fencing may seem less expensive than composite fencing. However, long-term costs often tell a different story. Traditional wood requires repeated staining, sealing, and occasional board replacement. Composite boards usually eliminate most of these recurring tasks. Over a 10 to 20 year period, the total cost of ownership often becomes more favorable for composite products. The higher initial price can be offset by reduced labor, fewer repairs, and lower maintenance expenses. If you want ideas for other durable decorative products with low upkeep, you can also explore our PVC decorative sheet solutions. How to Choose the Best Composite Fencing for Your Project Before buying a system, compare more than just color or price. A strong composite fencing project depends on product quality, weather resistance, and installation design. Wind rating: Important for exposed gardens and coastal areas. Warranty: A longer warranty often reflects stronger product confidence. Capping quality: Better capping improves UV and stain resistance. Fastener system: Hidden systems usually create a cleaner finish. Color consistency: Check that the finish matches your design expectations. For design inspiration, you can also explore outdoor privacy and garden boundary projects on Houzz. Conclusion Composite fencing is an excellent choice for homeowners who want a strong, attractive, and low-maintenance boundary. It combines the visual appeal of wood with modern material performance, making it suitable for long-term outdoor use. With the right product, proper spacing, and a quality capped finish, composite fence systems can help you create a clean and durable garden boundary while avoiding the endless sanding and staining cycle associated with timber.
SPC Flooring: The Waterproof Wood Alternative for Modern Homes
You likely know that water and wood don’t mix, yet the desire for rustic hardwood in kitchens and bathrooms remains high. For decades, renovation experts advised against this specific pairing to avoid warping, rot, and costly repairs caused by inevitable splashes or humidity. SPC flooring changes these rules by engineering a solution that ignores moisture entirely. Short for Stone Plastic Composite, this material combines limestone dust and stabilizers to create an ultra-dense core that looks like timber but survives where natural wood cannot. While older vinyl floors were flexible and prone to denting, this modern “rigid core” feels substantial and solid underfoot. Manufacturers designed waterproof SPC flooring (often labeled as SPC LVP flooring) to handle everything from basement floods to muddy paws, making it the new standard for durable home design. The “Layer Cake”: What’s Actually Inside Your SPC Plank? If you slice an SPC plank in half, you won’t see a solid block of material. It is actually a high-tech sandwich engineered to handle everything from muddy boots to dropped pans. Each layer in this “cake” has a specific job to keep your floors looking new and functioning properly. The standard breakdown includes: The Wear Layer: A clear, invisible shield that blocks scratches, scuffs, and stains. The Vinyl Image: The high-resolution print that gives the floor its realistic wood or stone appearance. The SPC Core: The dense “backbone” made of limestone dust and plastic that provides structure. The Attached Pad: A built-in foam underlayment often pre-attached to the bottom for sound dampening and comfort. The top layer is arguably the most critical for parents and pet owners. Think of the wear layer like the clear coat on a car; the thicker it is, the harder it is to scratch. This protection is measured in “mils,” and while a standard 12-mil coating works for guest rooms, you will want a 20-mil wear layer mil thickness for busy kitchens or homes with large dogs. Supporting everything is the limestone core durability that gives this flooring its name. Because the core is stone-based rather than just plastic, SPC core flooring is rigid like a wood plank instead of floppy like a vinyl sheet. This stability is exactly why it survives in environments where laminate and traditional vinyl often fail. Why the Stone Core Outperforms Traditional Vinyl and Laminate Most flooring materials react to the weather like a wooden door that sticks in the humid summer heat. Laminate and WPC (Wood Plastic Composite) tend to absorb moisture and expand, which can eventually cause your beautiful new planks to buckle or gap at the seams. This is the biggest difference in the stone composite vs laminate debate: because SPC is made mostly of limestone, it remains completely stable whether your thermostat is set to 65 or 85 degrees. You simply won’t need to worry about the floor shifting or swelling when the seasons change. Uneven subfloors have historically been a nightmare for vinyl installations. Old-school flexible vinyl would drape over every nail head or uneven seam, a problem known as “telegraphing” that makes a renovation look cheap. When comparing rigid core vs wpc or traditional luxury vinyl, SPC’s stiffness acts like a bridge over these minor imperfections. It provides a flat, smooth surface even if the concrete or plywood underneath isn’t perfectly level, saving you significant prep time and frustration during installation. While this density makes the floor practically indestructible, it does mean the plank feels harder underfoot than softer, air-filled options. This firmness is often listed in waterproof vinyl flooring pros and cons guides as a necessary trade-off for superior dent resistance against heavy furniture. However, the core is only half the battle; to fully protect your investment from daily abuse, you need to select the right shield thickness for the surface. Choosing the Right Thickness: 12-mil vs. 20-mil Wear Layers Most shoppers assume a thicker plank automatically means a stronger floor, but that is a common misconception. The durability against scratches and scuffs actually comes from the “wear layer,” a transparent protective coating measured in mils (distinct from the plank thickness in millimeters). Think of this wear layer mil thickness like the screen protector on your phone: while the rigid core prevents the floor from breaking, this top coating prevents the surface from getting ugly. Choosing the right thickness is a balancing act between maximum protection and your budget. A higher mil rating increases the SPC vinyl flooring price, but it acts as necessary insurance against claw marks and heavy foot traffic. Use this guide to match the spec to your room: 12-mil: Ideal for guest rooms, home offices, and low-traffic areas. 20-mil: Essential for homes with large dogs, energetic kids, or main living areas. 22-mil+: Reserved for commercial spaces or entryways that see muddy boots daily. While the best SPC vinyl flooring brands will clearly label these specs, generic options often hide a thin 6-mil layer behind a low price tag. Once you have selected a floor tough enough to handle your daily life, the next step is saving money on the labor to put it down. DIY Tips: How Click-Lock Planks Save You $2,000 in Labor One of the biggest financial advantages of SPC click plank flooring is the ability to bypass professional installation fees, which can often double the cost of a renovation. Unlike older flooring types that required messy glues or hundreds of nails, modern SPC uses a floating “tongue-and-groove” system. You simply angle one plank into another and lower it until you hear a satisfying snap, locking them together like puzzle pieces. This user-friendly design puts a high-end look within reach of the average weekend warrior. Because SPC is rigid—acting more like a stone slab than a flexible rubber mat—it requires a flat surface to perform correctly. If your subfloor has significant dips or humps, the stiff planks cannot bend to match the curve, creating hollow spots that sound cheap or “bouncy” when walked on. Leveling subfloor for vinyl is the most critical prep step; taking
Grout-Free Shower Wall Panels: The Smart Alternative to Tiles
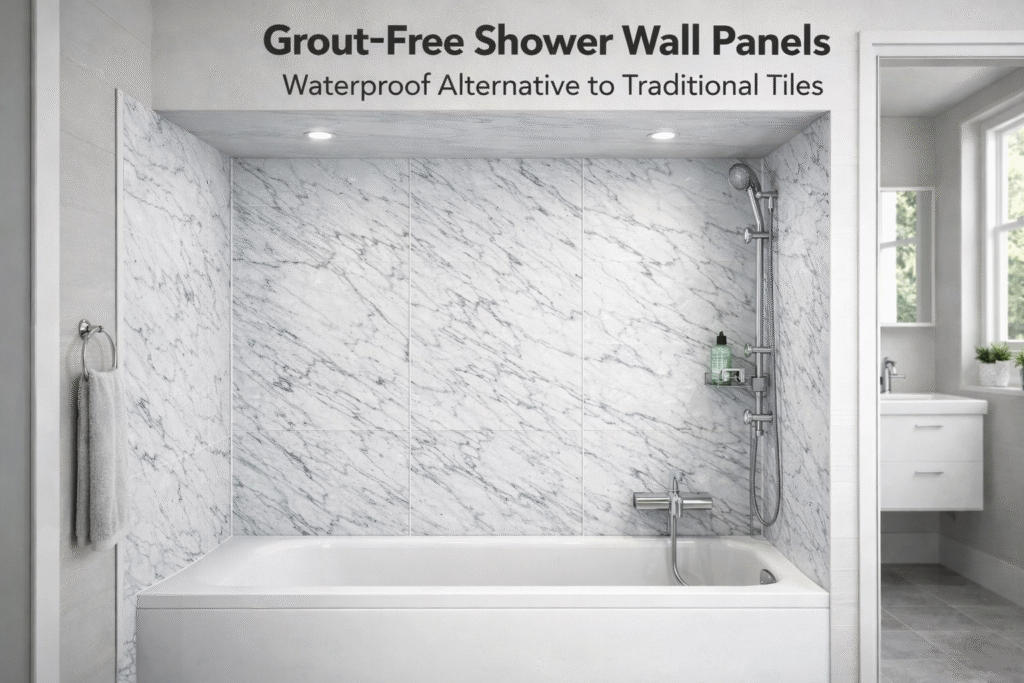
If you have ever spent a Saturday morning scrubbing discolored grout lines with an old toothbrush, you already understand the biggest weakness of traditional tile. Grout traps moisture, stains easily, and makes mold prevention much harder over time. Shower wall panels offer a smarter solution because they remove most of these joints and create a smooth, waterproof surface that is much easier to maintain. More homeowners and renovation professionals now choose shower wall panels because they combine modern design with strong moisture protection. Whether you select lightweight PVC, sleek acrylic, or high-end laminate, the main advantage remains the same: a non-porous wall covering that helps protect the structure behind your bathroom walls and reduces cleaning time dramatically. PVC, Acrylic, or Laminate Shower Wall Panels: Choosing the Right Material If budget is your main concern or you need a lightweight option for an easy installation, PVC sheets for showers are often the most practical choice. These panels are usually hollow and simple to handle, which makes them a popular option for quick bathroom upgrades and rental property renovations. They are affordable, but they can feel a little less solid than denser products. If you want better quality and a more premium finish, acrylic and laminate shower wall panels are stronger alternatives. Acrylic provides a glossy and fully waterproof finish, while laminate panels can recreate the look of natural stone or marble. These are excellent options if you want shower wall panels that look like tile while keeping installation and maintenance much easier. Good (Hollow PVC): Lowest cost, lightweight, and suitable for fast renovations. Better (Solid Acrylic): Mid-range price, durable finish, and modern appearance. Best (Composite or Laminate): Higher investment, premium look, and stronger impact resistance. If you want to compare other interior wall solutions, you can also review PVC marble sheets for indoor decoration or explore related decorative surfaces on ArchDaily. Can Shower Wall Panels Be Installed Over Existing Tiles? One of the biggest advantages of shower wall panels is that they can often be installed directly over old tiles. This saves time, avoids demolition, and reduces mess during the renovation process. In many situations, the existing wall surface can act as a stable base for waterproof bathroom panels. However, proper preparation is essential. If the old tiles are loose, cracked, or bulging, the new panels may not sit correctly. Before installation, make sure the surface is solid, flat, and clean. Solid Grip: Existing tiles must be firmly attached to the wall. True Flatness: The surface should be even and stable. Clean Surface: Remove soap residue, wax, and dust before applying adhesive. Most systems use tongue and groove interlocking systems to create a tighter fit between panels. In addition, applying a high-quality silicone sealant for waterproof joints helps stop water from reaching the wall behind the surface. Shower Wall Panels Sizes: From 4×8 Sheets to Seamless Finishes Large-format shower wall panels are popular because they reduce the number of joints in the bathroom. Standard waterproof bathroom wall panels 4×8 feet often match typical residential wall heights, which helps create clean and more seamless finishes. For a standard shower alcove, only a few panels may be needed to cover the entire area. Fewer joints mean fewer weak points for moisture and less long-term maintenance. This is one of the main reasons why large shower wall panels are preferred over traditional tiling in many modern bathrooms. Premium shower wall kits also provide better durability, especially in busy bathrooms where the walls are exposed to regular impact from bottles, elbows, and daily use. If long-term resistance matters, pay attention to thickness, surface finish, and core density. Shower Wall Panels vs Tile: Cost, Maintenance, and Long-Term Value At first glance, traditional tile can seem cheaper than shower wall panels. However, the full installation cost is often much higher once waterproofing materials, labor, grout, and finishing time are included. Tile usually requires more time and more skilled labor, while panel systems are much faster to install. Feature Ceramic Tile & Grout Wall Panel Systems Installation Time 3–5 days 4–8 hours Labor Cost High Low 10-Year Upkeep Re-grouting and sealing Simple wipe-down cleaning The maintenance savings are also important. Because shower wall panels create non-porous surfaces, they are easier to clean and do not require the same level of upkeep as tile and grout. This makes them a very attractive option for homeowners looking for a durable and low-maintenance bathroom solution. For additional inspiration on bathroom renovation trends, you can also consult Houzz. How to Plan a Shower Wall Panels Installation in 48 Hours Planning a bathroom renovation with shower wall panels starts with accurate measurements. Once you know the dimensions of your walls, you can choose the right panel size, material, and adhesive system for your layout. Whether you choose PVC, acrylic, or laminate, the goal is the same: install a fully waterproof wall surface that looks elegant and saves time during maintenance. If you want to explore more decorative interior solutions, you can also review indoor wall panel applications on our website. With the right preparation and the right product, shower wall panels can transform a bathroom in a single weekend. Instead of spending years cleaning grout and fighting moisture issues, you get a cleaner, more durable, and more modern solution that is designed for everyday use.
Sound Absorbing Panels for Better Interior Acoustics
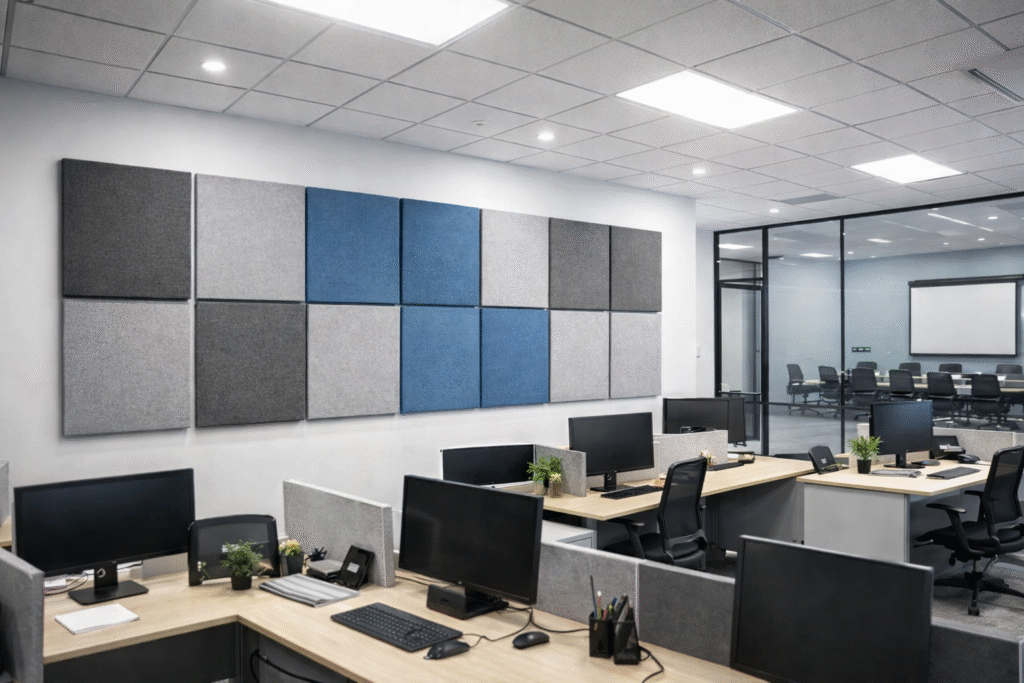
Sound absorbing panels are one of the most effective ways to reduce echo and improve comfort in modern interiors. Have you ever stepped into a sleek restaurant, office, or meeting room and realized you had to raise your voice just to be heard? In most cases, the real problem is not loud people, but the room itself. Hard surfaces such as glass, drywall, tile, and concrete reflect sound again and again, which creates a harsh and tiring acoustic environment. Think of your voice like a tennis ball thrown against a wall. On a hard surface, it rebounds instantly and chaotically. By contrast, properly selected acoustic treatment works like a catcher’s mitt and stops that rebound before it spreads across the room. That is why sound absorbing panels are widely used in offices, restaurants, studios, and residential spaces where clear speech and a calmer atmosphere matter. Why Sound Absorbing Panels Matter in Modern Interiors Many people confuse sound absorption with soundproofing, yet the two serve very different purposes. Absorption improves the sound quality inside a room by reducing echo and reverberation. Soundproofing, on the other hand, aims to block noise from passing through walls, floors, or ceilings. If your home office sounds hollow on video calls or your living room feels noisy even with only a few people inside, the issue usually comes from reflected sound. In that case, sound absorbing panels are often the right solution because they control the acoustic bounce that makes rooms feel louder than they really are. Sound absorption: improves clarity, reduces echo, and makes speech easier to understand. Soundproofing: reduces sound transfer between separate rooms or buildings. Understanding this difference helps avoid expensive mistakes. If your goal is to create a quieter and more comfortable space rather than rebuild walls, acoustic treatment is usually the smarter first step. How These Acoustic Panels Work When sound waves hit a hard, flat surface, they reflect back into the room. When that happens repeatedly, voices blur together and the room feels sharp, busy, and fatiguing. Acoustic panels interrupt this process by absorbing part of the sound energy instead of letting it bounce back. Dense materials such as polyester fiber, mineral wool, or fiberglass are especially effective because they trap sound energy inside their structure. This reduces reverberation and improves speech clarity. If you want a technical overview of this principle, you can also refer to this resource on acoustic panels. In practical terms, this means conversations become easier to follow, online meetings sound more professional, and the room feels more controlled. That is why these products are used in spaces where both comfort and communication are important. Choosing the Right Material for Acoustic Performance Not all acoustic products perform the same way. Foam is often chosen for budget setups because it is lightweight and easy to install. However, denser materials usually absorb a wider range of frequencies and perform better in real workspaces or living areas. Fabric-wrapped panels filled with mineral wool or fiberglass often provide stronger overall results than thin foam, especially in rooms where lower voices, HVAC noise, or general crowd noise are present. Decorative polyester products can also work well when design matters as much as function. If appearance is important, you may want to look at our acoustic panels collection and compare finishes, colors, and panel styles designed for modern interiors. Where to Place Sound Absorbing Panels for the Best Results Even high-quality products can underperform if they are placed randomly. Placement matters because most distracting reflections happen at the first points where sound bounces from walls or ceilings back to your ears. A simple way to find these spots is the mirror method: Sit in your normal listening or working position. Ask someone to slide a mirror along the wall at ear level. Mark the position where you first see the speaker, monitor, or major sound source reflected. Center your panel in that zone. In many rooms, covering just 15% to 20% of the reflective surface area can already improve clarity significantly. Therefore, you do not always need to cover every wall. A focused installation often delivers better visual balance and strong acoustic improvement at the same time. If you are planning a larger interior upgrade, you can also combine acoustic treatment with decorative wall finishes such as WPC wall and ceiling cladding for a more cohesive design result. Decorative Options That Do Not Ruin Your Design One of the biggest reasons people delay acoustic treatment is aesthetics. Many still imagine dark studio foam or bulky technical boards. Today, that is no longer the only option. Decorative products now come in geometric shapes, fabric finishes, printed surfaces, and custom colors that work well in offices, meeting rooms, lounges, and homes. Because of this evolution, sound absorbing panels are no longer just technical tools. They can also function as part of the room’s design language. In some spaces, they appear as clean architectural features. In others, they act more like framed wall art while still improving acoustic comfort. For projects that need both performance and visual consistency, it also helps to review our contact page to discuss suitable panel sizes, finishes, and installation ideas. How to Read Acoustic Performance Without Overcomplicating It When comparing products, many buyers look at NRC ratings. The Noise Reduction Coefficient gives a quick indication of how much sound a material absorbs. For example, an NRC of 0.80 means the product absorbs about 80% of the sound energy that hits it. You do not need the highest number in every room. For many home offices, meeting rooms, and residential interiors, a balanced specification is more useful than an extreme one. The goal is not to make the room feel unnaturally dead. The goal is to reduce harsh reflections and create a more comfortable acoustic environment. Your Practical Action Plan If you want to improve a noisy room without major construction work, start with three steps: Identify the problem: echo, speech clarity, or general harshness. Choose the right product: denser
