
SPC Flooring: The Waterproof Wood Alternative for Modern Homes
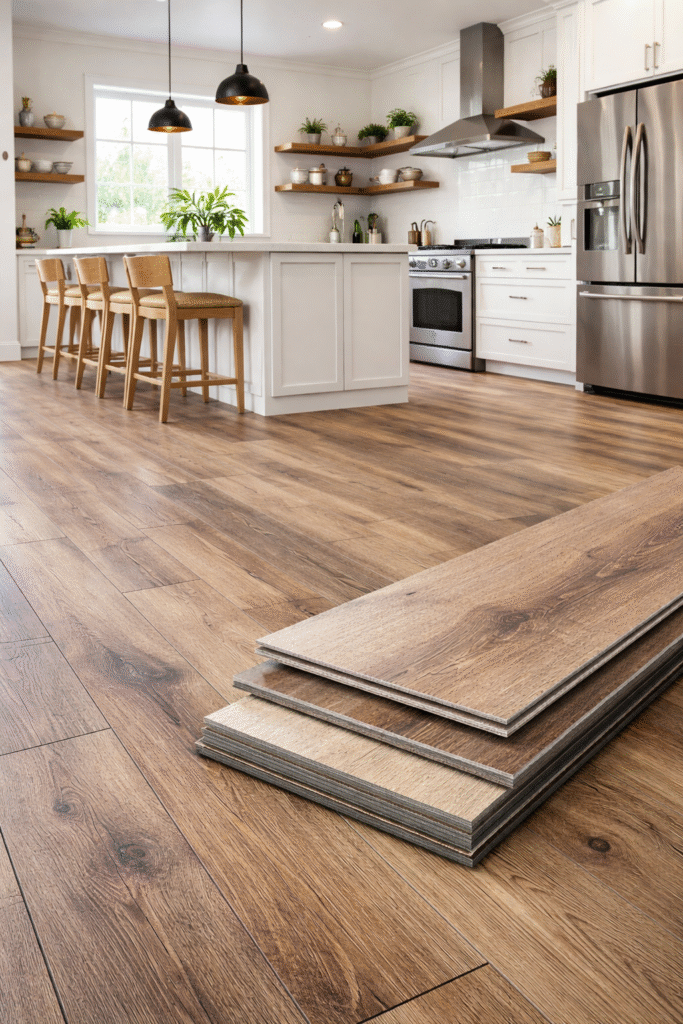
You likely know that water and wood don’t mix, yet the desire for rustic hardwood in kitchens and bathrooms remains high. For decades, renovation experts advised against this specific pairing to avoid warping, rot, and costly repairs caused by inevitable splashes or humidity. SPC flooring changes these rules by engineering a solution that ignores moisture entirely. Short for Stone Plastic Composite, this material combines limestone dust and stabilizers to create an ultra-dense core that looks like timber but survives where natural wood cannot. While older vinyl floors were flexible and prone to denting, this modern “rigid core” feels substantial and solid underfoot. Manufacturers designed waterproof SPC flooring (often labeled as SPC LVP flooring) to handle everything from basement floods to muddy paws, making it the new standard for durable home design. The “Layer Cake”: What’s Actually Inside Your SPC Plank? If you slice an SPC plank in half, you won’t see a solid block of material. It is actually a high-tech sandwich engineered to handle everything from muddy boots to dropped pans. Each layer in this “cake” has a specific job to keep your floors looking new and functioning properly. The standard breakdown includes: The Wear Layer: A clear, invisible shield that blocks scratches, scuffs, and stains. The Vinyl Image: The high-resolution print that gives the floor its realistic wood or stone appearance. The SPC Core: The dense “backbone” made of limestone dust and plastic that provides structure. The Attached Pad: A built-in foam underlayment often pre-attached to the bottom for sound dampening and comfort. The top layer is arguably the most critical for parents and pet owners. Think of the wear layer like the clear coat on a car; the thicker it is, the harder it is to scratch. This protection is measured in “mils,” and while a standard 12-mil coating works for guest rooms, you will want a 20-mil wear layer mil thickness for busy kitchens or homes with large dogs. Supporting everything is the limestone core durability that gives this flooring its name. Because the core is stone-based rather than just plastic, SPC core flooring is rigid like a wood plank instead of floppy like a vinyl sheet. This stability is exactly why it survives in environments where laminate and traditional vinyl often fail. Why the Stone Core Outperforms Traditional Vinyl and Laminate Most flooring materials react to the weather like a wooden door that sticks in the humid summer heat. Laminate and WPC (Wood Plastic Composite) tend to absorb moisture and expand, which can eventually cause your beautiful new planks to buckle or gap at the seams. This is the biggest difference in the stone composite vs laminate debate: because SPC is made mostly of limestone, it remains completely stable whether your thermostat is set to 65 or 85 degrees. You simply won’t need to worry about the floor shifting or swelling when the seasons change. Uneven subfloors have historically been a nightmare for vinyl installations. Old-school flexible vinyl would drape over every nail head or uneven seam, a problem known as “telegraphing” that makes a renovation look cheap. When comparing rigid core vs wpc or traditional luxury vinyl, SPC’s stiffness acts like a bridge over these minor imperfections. It provides a flat, smooth surface even if the concrete or plywood underneath isn’t perfectly level, saving you significant prep time and frustration during installation. While this density makes the floor practically indestructible, it does mean the plank feels harder underfoot than softer, air-filled options. This firmness is often listed in waterproof vinyl flooring pros and cons guides as a necessary trade-off for superior dent resistance against heavy furniture. However, the core is only half the battle; to fully protect your investment from daily abuse, you need to select the right shield thickness for the surface. Choosing the Right Thickness: 12-mil vs. 20-mil Wear Layers Most shoppers assume a thicker plank automatically means a stronger floor, but that is a common misconception. The durability against scratches and scuffs actually comes from the “wear layer,” a transparent protective coating measured in mils (distinct from the plank thickness in millimeters). Think of this wear layer mil thickness like the screen protector on your phone: while the rigid core prevents the floor from breaking, this top coating prevents the surface from getting ugly. Choosing the right thickness is a balancing act between maximum protection and your budget. A higher mil rating increases the SPC vinyl flooring price, but it acts as necessary insurance against claw marks and heavy foot traffic. Use this guide to match the spec to your room: 12-mil: Ideal for guest rooms, home offices, and low-traffic areas. 20-mil: Essential for homes with large dogs, energetic kids, or main living areas. 22-mil+: Reserved for commercial spaces or entryways that see muddy boots daily. While the best SPC vinyl flooring brands will clearly label these specs, generic options often hide a thin 6-mil layer behind a low price tag. Once you have selected a floor tough enough to handle your daily life, the next step is saving money on the labor to put it down. DIY Tips: How Click-Lock Planks Save You $2,000 in Labor One of the biggest financial advantages of SPC click plank flooring is the ability to bypass professional installation fees, which can often double the cost of a renovation. Unlike older flooring types that required messy glues or hundreds of nails, modern SPC uses a floating “tongue-and-groove” system. You simply angle one plank into another and lower it until you hear a satisfying snap, locking them together like puzzle pieces. This user-friendly design puts a high-end look within reach of the average weekend warrior. Because SPC is rigid—acting more like a stone slab than a flexible rubber mat—it requires a flat surface to perform correctly. If your subfloor has significant dips or humps, the stiff planks cannot bend to match the curve, creating hollow spots that sound cheap or “bouncy” when walked on. Leveling subfloor for vinyl is the most critical prep step; taking
Grout-Free Shower Wall Panels: The Smart Alternative to Tiles
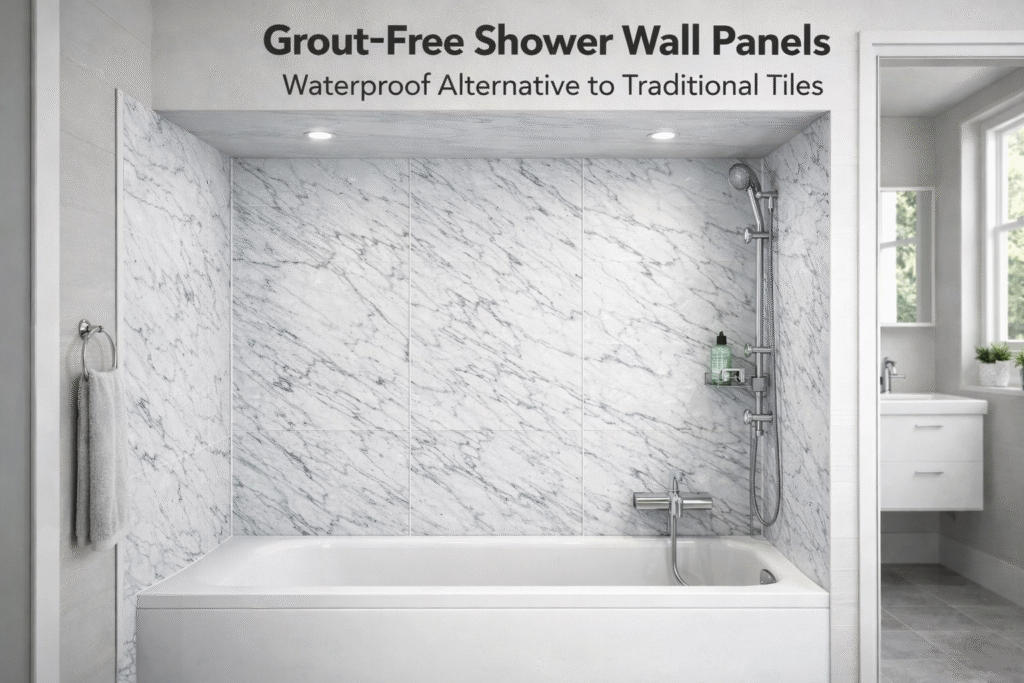
If you have ever spent a Saturday morning scrubbing discolored grout lines with an old toothbrush, you already understand the biggest weakness of traditional tile. Grout traps moisture, stains easily, and makes mold prevention much harder over time. Shower wall panels offer a smarter solution because they remove most of these joints and create a smooth, waterproof surface that is much easier to maintain. More homeowners and renovation professionals now choose shower wall panels because they combine modern design with strong moisture protection. Whether you select lightweight PVC, sleek acrylic, or high-end laminate, the main advantage remains the same: a non-porous wall covering that helps protect the structure behind your bathroom walls and reduces cleaning time dramatically. PVC, Acrylic, or Laminate Shower Wall Panels: Choosing the Right Material If budget is your main concern or you need a lightweight option for an easy installation, PVC sheets for showers are often the most practical choice. These panels are usually hollow and simple to handle, which makes them a popular option for quick bathroom upgrades and rental property renovations. They are affordable, but they can feel a little less solid than denser products. If you want better quality and a more premium finish, acrylic and laminate shower wall panels are stronger alternatives. Acrylic provides a glossy and fully waterproof finish, while laminate panels can recreate the look of natural stone or marble. These are excellent options if you want shower wall panels that look like tile while keeping installation and maintenance much easier. Good (Hollow PVC): Lowest cost, lightweight, and suitable for fast renovations. Better (Solid Acrylic): Mid-range price, durable finish, and modern appearance. Best (Composite or Laminate): Higher investment, premium look, and stronger impact resistance. If you want to compare other interior wall solutions, you can also review PVC marble sheets for indoor decoration or explore related decorative surfaces on ArchDaily. Can Shower Wall Panels Be Installed Over Existing Tiles? One of the biggest advantages of shower wall panels is that they can often be installed directly over old tiles. This saves time, avoids demolition, and reduces mess during the renovation process. In many situations, the existing wall surface can act as a stable base for waterproof bathroom panels. However, proper preparation is essential. If the old tiles are loose, cracked, or bulging, the new panels may not sit correctly. Before installation, make sure the surface is solid, flat, and clean. Solid Grip: Existing tiles must be firmly attached to the wall. True Flatness: The surface should be even and stable. Clean Surface: Remove soap residue, wax, and dust before applying adhesive. Most systems use tongue and groove interlocking systems to create a tighter fit between panels. In addition, applying a high-quality silicone sealant for waterproof joints helps stop water from reaching the wall behind the surface. Shower Wall Panels Sizes: From 4×8 Sheets to Seamless Finishes Large-format shower wall panels are popular because they reduce the number of joints in the bathroom. Standard waterproof bathroom wall panels 4×8 feet often match typical residential wall heights, which helps create clean and more seamless finishes. For a standard shower alcove, only a few panels may be needed to cover the entire area. Fewer joints mean fewer weak points for moisture and less long-term maintenance. This is one of the main reasons why large shower wall panels are preferred over traditional tiling in many modern bathrooms. Premium shower wall kits also provide better durability, especially in busy bathrooms where the walls are exposed to regular impact from bottles, elbows, and daily use. If long-term resistance matters, pay attention to thickness, surface finish, and core density. Shower Wall Panels vs Tile: Cost, Maintenance, and Long-Term Value At first glance, traditional tile can seem cheaper than shower wall panels. However, the full installation cost is often much higher once waterproofing materials, labor, grout, and finishing time are included. Tile usually requires more time and more skilled labor, while panel systems are much faster to install. Feature Ceramic Tile & Grout Wall Panel Systems Installation Time 3–5 days 4–8 hours Labor Cost High Low 10-Year Upkeep Re-grouting and sealing Simple wipe-down cleaning The maintenance savings are also important. Because shower wall panels create non-porous surfaces, they are easier to clean and do not require the same level of upkeep as tile and grout. This makes them a very attractive option for homeowners looking for a durable and low-maintenance bathroom solution. For additional inspiration on bathroom renovation trends, you can also consult Houzz. How to Plan a Shower Wall Panels Installation in 48 Hours Planning a bathroom renovation with shower wall panels starts with accurate measurements. Once you know the dimensions of your walls, you can choose the right panel size, material, and adhesive system for your layout. Whether you choose PVC, acrylic, or laminate, the goal is the same: install a fully waterproof wall surface that looks elegant and saves time during maintenance. If you want to explore more decorative interior solutions, you can also review indoor wall panel applications on our website. With the right preparation and the right product, shower wall panels can transform a bathroom in a single weekend. Instead of spending years cleaning grout and fighting moisture issues, you get a cleaner, more durable, and more modern solution that is designed for everyday use.
